Last Sunday, I had fun with my hubby's clan. We had a swimming activity somewhere in North and I can say that I enjoyed so much the Tsunami wave because I feel body aches now. Lol. Hmm... lack of exercise I know. Anyway, in connection with the last nail post, today I will share to you my #2 last hurrah for summer.
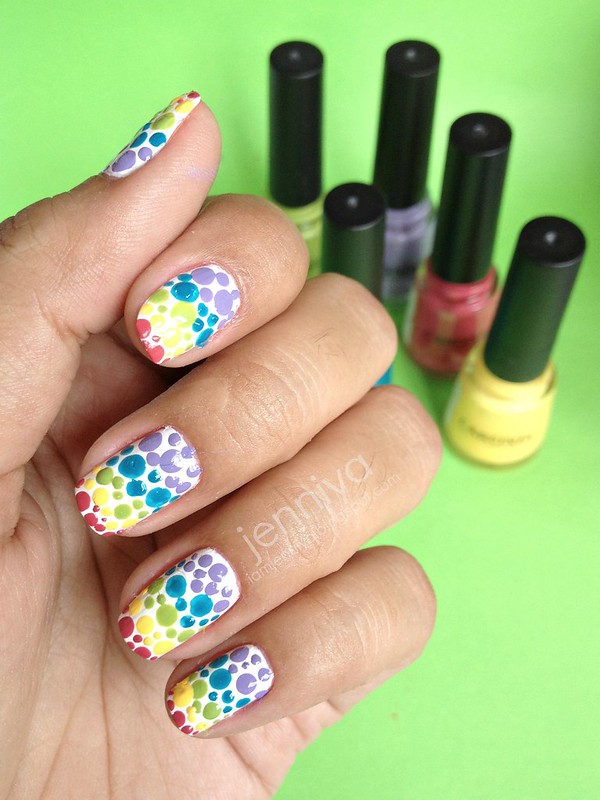 Rainbow Spotted Nail Art
If you follow me on Instagram, you'd probably guess upon seeing this photo that this is what I come up with the 5 shades of nail polishes I posted in IG. During the times that I can't think of any original nail art ideas, there's only one YouTube channel I ran to - cutepolish. I have recreated a few of her nail arts like Minnie Mouse, Kiwi, Newspaper & Polka Dots. This time, I've recreated her Rainbow Spotted.
I did this nail art prior to the family activity. Honestly, this is the easiest nail art I did as far as I remember because I just made dots. Trust me it's that easy. Now, check your nail polishes and pick the rainbow shades. Good thing I have Caronia shades which perfectly suit for this nail art. As promised, here's an easy tutorial for Rainbow Spotted Nail Art.

L - R: First Crush, Blueberry, Sweet Surprise, Kiwi, Summer Fling & White Satin
Step #1. Apply 2 coats of White Satin onto the nails. Let it dry.

Step #2. Get a toothpick and old CD. In my case, I used my nail art plate. Put a small amount of First Crush (nail art here) on the plate and dip the toothpick. Then, dot it onto the nail. Create small & big dots starting from the top cuticle. Just estimate to dot about 20% of the nail.

Step #3. Same as the Step #2, do it with Blueberry (nail art here), & Kiwi (nail art here). Do not forget to dot in estimate up to 20% part of nail only so you can apply five (5) polishes. TIP: Use both end of the toothpick for bigger and smaller dots.

I actually thought of stopping here since I find this a pretty simple nail art and it looks so clean but then, I continued dotting. I took a picture of it however for you to see some options.
Step #4. Finish making dots of Sweet Surprise and Summer Fling. The latter instantly lifted all the colors. Agree?

Step #5. Let all the dots to dry. I t will took up to 30 minutes because of the thick dots. Make sure when you put the top coat, the last dots you made on the nail tips are dry already or else your precious nail art will be ruined. It happened to my one pinky nail; the Summer Fling wasn't totally dry and it cling to the nail brush of the top coat.

If you've watched cutepolish tutorial, she actually used 6 polishes but I do not have an Orange one so I omit that, hence, I used only five polishes.


I took this picture when hubby and I sat down on the grass near our rented cottage. My skin was obviously dried up from the chlorine of the pool. If you'll take a closer look, my cuticles around my nails are obviously flaking. By the way, all the pictures were taken using iPhone 5.
What do you think of this nail art?
XX,

Be IamJenniya's Reader of the Month for May.
No comments:
Post a Comment