Showing posts with label Elianto. Show all posts

Tuesday, 6 December 2011

Tutorial: Easy Polka Dots


Hi everyone! It's been a custom for others (including me) to wear polka dots on New Year. Mostly says that it will bring you luck the entire year if you wear rounded designs in your body. It can be your clothes, shoes, head accessories and anything that you will wear on the night of 31st of December to welcome the New Year.

There is no limitations how heavy dots you can wear, so I think of why not doing it more in a fab way? So, today I recreated Easy Polka Dots by cutepolish. By the way, my previous Kiwi nail art was also a recreation from cutepolish.

Easy Polka Dots

So, let's get started.

Step 1. Prepare the nail polishes and other tools.
- Elianto in Twilight (black)
- Caronia in Regular White
- L.A. Colors Art Deco in Gold Glitter; or
- Caronia in Frosted Platinum Glitter
- Caronia Fast-Dry Top Coat
- a toothpick
- CD/ Disc; &
- a tape.


Step 2. Cut a tape and paste diagonally onto nails. 

Step 3. Take the regular back polish and apply it onto nails just in the bottom section. You just fill-up the space to create a diagonal French tip. Wait for the polish to get dry for approximately 8 minutes.

Step 4. If it's already dry, take-off the tape by pulling it from the bottom.

Step 5. Put the regular white polish in the CD. Dip your toothpick in the polish and dot it onto nails.
It is your choice of filling polka dots to all your French tips; or
... you might want to try leaving your two (2) nails undotted; or
... you prefer only one (1) nail undotted. 

Step 6. In this step, from the two (2) glitters polish, I opted to use the L.A. Colors in Gold Glitter because of it tiny brush. I find it very easy to line the upper tip. 

Step 7. Finished your nail art with your favorite top coat.
Ta-da!

Meet Pnoy bear..

Do you find it easy?

XX,

iamjenniya

Friday, 2 December 2011

Tutorial: KIWI Nail Art


Hey everyone! I know, I know. It's been a long while since I last posted. I've been travelling lately and when I came back, I had a lot of things to catch on. Then, I got so busy updating my other blog which is a travel blog. If you have time, please do visit my travel blog - Wanderings.

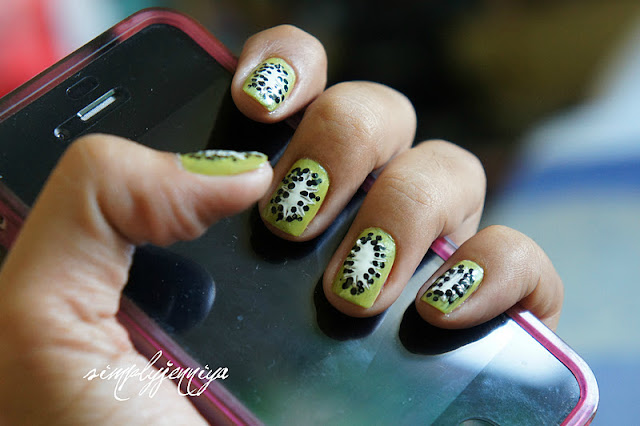
Anyway, I am back with a new nail art tutorial. Today I will share to you a tutorial inspired by Kiwi fruit.

Kiwifruit - often shortened to Kiwi in many parts of the world. 

Kiwi Nail Art

So, let's get started.

Step 1. Prepare the nail polishes and other tools.
- Regular Black and White polish
- Frosted Light Green polish
- Toothpick
- Disc/ CD

Step 2. Apply the regular white polish onto nails. I did apply first a white polish before applying the light green polish to make the green more opaque.

Step 3. After the white polish gets dry, apply the light green onto nails. Apply three (3) coats for nice opacity.
Clean out the excess using a Q-tip soaked from polish remover.

Obtained the perfect same color by 3 coats. Yey!

Step 4. Using the white polish, brush it onto the middle your finger creating an oval shape.

Step 5. After drafting the oval shapes onto nails, put on thick amount of polish onto the oval. Then, take the toothpick and create streaks outward.

Step 6. Pour a little amount of black polish onto the disc/CD. Take the toothpick, dip onto polish and dot it in between of each streak.

Step 7. You're almost done! Now, apply a regular colorless polish to flatten the design. 

Step 8. Of course, I always finished my nail art design with quick dry top coat.

There you have it. Isn't it so easy? 

XX,

iamjenniya

Tuesday, 25 January 2011

Eye Of The Week: BASIC TO WARM TOUCHES TO FOREST GREEN EYE LOOKS (Series 1)


Since the day I started using eye glasses, I got inspired to do eye make-up that will suit my new look. I'm concentrating on my eyes, of course. I used my latest "babies" - Elianto Colour Studio and Etude House to experiment my new eye looks. I'm so happy with how the Etude House eye shadow does its job. I was disappointed for Elianto but no big deal though. So, here are some photos that I want to share with you guys. These are the ones that been keeping me busy nowadays lols!

Eye Of The Week - Look 1: BASIC
 
 
Products used:
o NYX Eye Shadow Base in Skintone. 
o Bobbi Brown Eye Shadow in Nude.
 o Bobbi Brown Long Wear Gel Eye Liner in Sepia Ink.
o Nichido  Colour Intense Eye Pencil in Vivid Turquoise.
o IN2IT Mascara in Black.

Eye Of The Week - Look 2: WARM TOUCHES


Products used:
o NYX Eye Shadow Base in Skintone.
o Etude House Single eye shadows in White.
o Etude House Single eye shadows in Pale Light Blue.
o NYX Jumbo Eye Pencil in Milk.
o MAC Quad Eye Shadow in Garcon Gray & Bistro.
o Bobbi Brown Long Wear Gel Eye Liner in Sepia Ink.
o Nichido Colour Intense Eye Liner in Turquoise & Deep Plum.
o IN2IT Mascara in Black.

Eye Of The Week - Look 3: FOREST GREEN LOOK
 
 
Products used:
o NYX Eye Shadow Base in Skintone.
o Etude House Single eye shadows in White.
o MAC Quad Eye Shadow in Bistro.
o Elianto Colour Studio in Nile Green.
o Elianto Colour Studio in Young Lemon.
o Elianto Colour Studio in Celadon Green.
o IN2IT Liquid Eye Liner in Black.
o IN2IT Waterproof Eye Liner in Pearl.
o IN2IT Mascara in Black.

I've decided to make a series of EOTW (Eye of The Week) every month. I will do 2-3 eye look every week until I get tired doing it, lols! So, expect a load of different eye make-ups. I already started this week. Okay, so that's my EOTW's (Eye of The Week) for now. Hope you had fun. Until my next post beauties!

Smile always and stay tuned.

XX,

Jenniya

Monday, 24 January 2011

HAUL: COLOUR STUDIO EYE SHADOWS BY ELIANTO

Last weekend, we went to Megamall again to re-align my eye glasses. As always, I took the chance of passing by at Watsons Beauty. I've checked again Wet 'n Wild station and looked for other Silk Finish Lipstick shades but my choices which are the pink/mauve colors weren't available. A lot of shades were out of stock actually. I thought I could go home without any make-up purchases but I was wrong because I saw the Elianto with their Php50 sale. I immediately checked what's on sale. Heck, Php50?!? Are they kidding? Huh they're not!

Well, Php50 for a very few selected items only. It includes the make-up brushes, make-up refill palettes, and single eye shadows. Temptation got into me. You can't blame me... Php50 (approx.US$1.13)?!? I drooled. 

Meet my new babies - Colours Studio by Elianto.
 This is my first eye shadow purchase from Elianto. Finally, the time to try this make-up happened that day. Thank you sa Sale hehehe.

Unboxing my single eye shadows:

The Vibrant Shadow is a pure matte eye shadow.
Colour Studio by Elianto 
Vibrant Shadow in 07 Coral Pink

 
Colour Studio by Elianto 
Vibrant Shadow in 19 Young Lemon

The Pearl Shine Shadow is a matte eye shadow with shining gold pearls when applied.
 
Colour Studio by Elianto 
Pearl Shine Shadow in 03 Nile Green

 
Colour Studio by Elianto 
Pearl Shine Shadow in 05 Celadon Green

Time to swatch!
Taken with natural light by the window; no camera flash.
Left to Right: Young Lemon, Coral Pink, Celadon Green, Nile Green.

Taken indoor; with camera flash.

What I like:
o The price was such a steal! The original price was Php149 (aprrox.US$3.36) each marked down to Php50 (US$1.13) only.
o The Pearl Shine Shadows are much pigmented. One swipe and you're good to go.
o I find the matte ones a bit chalky.

What I don't like:
o The Vibrant Shadows aren't that pigmented; both the 07 Coral Pink & 19 Young Lemon. It took me 2-3 swipes before it reveals the true color.

Verdict: 
For the dirty cheap price of Php50, I can't think of anything to complain hehehe. The Vibrant Shadow in 07 Coral Pink can also be used as blusher coz it is matte. Yey!

I also bought an Elianto 4-colors refill palette for only Php50 (this was originally priced at Php109). There's also a 6-color refill palette for Php80 only but I chose by 4's coz the 4 eye shadows above are the just the colors that I like and I think is wearable at daytime. 

Time to put my single pots to the palette.
 
 
Finished. Yey! Now this is another palette in addition to my growing make-up collection. 

I am so excited to do a make-up tutorial using my new babies - Elianto. Lols! The colors are so cool and lovely noh? Smile always and stay tuned.

XX,

Jenniya