Showing posts with label L.A. Colors. Show all posts

Tuesday, 6 December 2011

Tutorial: Easy Polka Dots


Hi everyone! It's been a custom for others (including me) to wear polka dots on New Year. Mostly says that it will bring you luck the entire year if you wear rounded designs in your body. It can be your clothes, shoes, head accessories and anything that you will wear on the night of 31st of December to welcome the New Year.

There is no limitations how heavy dots you can wear, so I think of why not doing it more in a fab way? So, today I recreated Easy Polka Dots by cutepolish. By the way, my previous Kiwi nail art was also a recreation from cutepolish.

Easy Polka Dots

So, let's get started.

Step 1. Prepare the nail polishes and other tools.
- Elianto in Twilight (black)
- Caronia in Regular White
- L.A. Colors Art Deco in Gold Glitter; or
- Caronia in Frosted Platinum Glitter
- Caronia Fast-Dry Top Coat
- a toothpick
- CD/ Disc; &
- a tape.


Step 2. Cut a tape and paste diagonally onto nails. 

Step 3. Take the regular back polish and apply it onto nails just in the bottom section. You just fill-up the space to create a diagonal French tip. Wait for the polish to get dry for approximately 8 minutes.

Step 4. If it's already dry, take-off the tape by pulling it from the bottom.

Step 5. Put the regular white polish in the CD. Dip your toothpick in the polish and dot it onto nails.
It is your choice of filling polka dots to all your French tips; or
... you might want to try leaving your two (2) nails undotted; or
... you prefer only one (1) nail undotted. 

Step 6. In this step, from the two (2) glitters polish, I opted to use the L.A. Colors in Gold Glitter because of it tiny brush. I find it very easy to line the upper tip. 

Step 7. Finished your nail art with your favorite top coat.
Ta-da!

Meet Pnoy bear..

Do you find it easy?

XX,

iamjenniya

Friday, 2 December 2011

Tutorial: KIWI Nail Art


Hey everyone! I know, I know. It's been a long while since I last posted. I've been travelling lately and when I came back, I had a lot of things to catch on. Then, I got so busy updating my other blog which is a travel blog. If you have time, please do visit my travel blog - Wanderings.

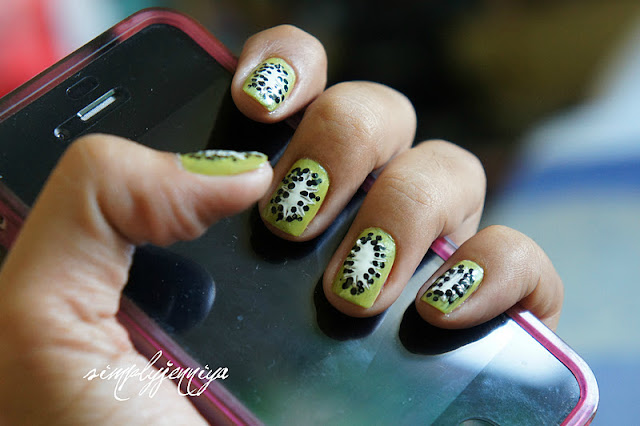
Anyway, I am back with a new nail art tutorial. Today I will share to you a tutorial inspired by Kiwi fruit.

Kiwifruit - often shortened to Kiwi in many parts of the world. 

Kiwi Nail Art

So, let's get started.

Step 1. Prepare the nail polishes and other tools.
- Regular Black and White polish
- Frosted Light Green polish
- Toothpick
- Disc/ CD

Step 2. Apply the regular white polish onto nails. I did apply first a white polish before applying the light green polish to make the green more opaque.

Step 3. After the white polish gets dry, apply the light green onto nails. Apply three (3) coats for nice opacity.
Clean out the excess using a Q-tip soaked from polish remover.

Obtained the perfect same color by 3 coats. Yey!

Step 4. Using the white polish, brush it onto the middle your finger creating an oval shape.

Step 5. After drafting the oval shapes onto nails, put on thick amount of polish onto the oval. Then, take the toothpick and create streaks outward.

Step 6. Pour a little amount of black polish onto the disc/CD. Take the toothpick, dip onto polish and dot it in between of each streak.

Step 7. You're almost done! Now, apply a regular colorless polish to flatten the design. 

Step 8. Of course, I always finished my nail art design with quick dry top coat.

There you have it. Isn't it so easy? 

XX,

iamjenniya

Sunday, 11 July 2010

Nail Of The Week: Minty Pinky Nails


Do you miss me posting my nail arts? Ahaha... I wish I have followers, lols! Anyways, I really miss doing nail arts. After our Boracay getaway, I've had a lot of things that needed to catch up and been doing it for a couple of weeks now. Actually, even today, Sunday, we assisted a client in Makati to do a list of things for move-out. So, we got free this afternoon only and finally, I was able to do nail art again. Phew!


Since my mind and body still can't get over of Boracay (hu hu hu, am going back soon Boracay, lols!), I cannot also think of an art. I browsed askmewhats.com blogs about her nail art tutorials and finally, I decided to recreate/ modify her Minty Chocolate Nail Art since this was the first nail art that my Mom tried on to my nails the time she received my gift. My Mom was so happy and couldn't believed she finally owned one. She's been lemming for it for quite a long time. I like the nail art that my Mom recreated for me and so, now, I recreated it too. I don't know if she (Nikki) still remembers me in case she happen to read this. It's from her where I bought the PrettyNails - set of twelve (12) of two-way nail art pens that I gave as gift to my Mom.  Yes, nagmana ako sa Mom ko sa kakikayan hehehe. I was happy to know that all those polish colors she used, eventually I owned a similar polishes, too. Yay!

Minty Pinky Nails 

To start with, you will need the following:

From left: White, Baby Pink, Radiation, Magenta &  Black Sparkles

Step 1.  Start with a clean nails. Apply the L.A. Color Craze in Radiation onto nails. Apply two (2) coats.

Step 2. Make a thin French tip using the L.A. Art Deco in Black Sparkles.

You can either stop here and get this neat French tip design only or...
...go on further.

Step 3. Create five (5) dots using the L.A. Art Deco in Baby Pink, and... 
... quickly feather it inward to create a flower. Then, apply three (3) dots to add more beauty.


Step 4. Make a French tip using L.A. Art Deco in White, apply it thinly as you could. This step can also be make right after your Black Sparkles french tip (refers to Step 2).

Step 5. Using L.A. Art Deco in Magenta, put dots to each of the flower you created for a nice bud.

Step 6. Lastly, always finished your work of art with a top coat. 
My Minty Pinky Nails, yay!

Hope you enjoy my recreated nail art (thanks Nikki of askmewhats.com) for this very cute design. Stay tuned beauties.

XX, 


Jenniya

Sunday, 25 April 2010

Haul: Another Sort of Hoarding


Hey guys! Last Thursday, I and hubs went hoarding.

When we went to Market!Market! Fort Bonifacio, I dropped in their beauty section in the ground floor department store just to see what's new. But you know what I've discovered? L.A. Colors is now available locally! Yes, you've read it right. You can now buy L.A. Colors in the ground floor department store of Market!Market! Yipee!!


But am not into their make-ups, a-ah. I've drooled into L.A. Colors Art Deco and nail polishes. I can't believe. My eyes were like the eyes of the tarsier I think when I was picking the Art Decos and polishes that I wanted. Ohhh, I want them all, all the colors! I wish I can have them all that time.

Well, maybe you're wondering what made me so "O.A." (over acting) was that these products were clicks away from the website of CherryCulture.com. Yes darling, you can buy these products through online shopping straight from the U.S. So, there, now I hope you understand what I am drooling about these product most especially the nail polishes. Awww! I love you L.A.Colors!

I have tried ordering make-ups from U.S. but the custom duties and taxes sucks! I usually choose shipping method through FedEx Int'l. Economy (with tracking) because my items reached to me right at my doorstep, intact, sealed and my items are SAFE from the "crocodiles". I never tried post office as I've read tons of negative comments when you claim your items from them. Oookay, so much for that.

Well, I stopped ordering make-ups from U.S. because I think I've had enough already. Yeah, its true and fun... clicking the "Add to Cart" button and the "Checkout" button 'coz the items are cheap but the shipping cost is expensive, I swear... plus the custom duties and local taxes...ugh! So, it’s just like you shop the items 30-40% cheaper than buying it from a local reseller.

Okay, so back to the things I am drooling about. Here it is, presenting....


the L.A. Colors nail polishes

the L.A. Colors Art Deco (with thin brushes)

Plus, I couldn't resist not buying these nail polishes from Elianto. Oh, I really love glittery colors.

Elianto nail polish

I love the colors, so so so much! I can't wait to use it. So, I thought I'm already done with my L.A. Colors hoarding but I was not. When hubs went to NIKE store, my eyes almost pop-out when I saw these super cutie sun visors. A-ah, not just a cutie visor but I can use this as nice accessory as well. I call these as my Fashion Sun Visors. Why? Look at these photos below.

I love this because it has a soft-foamed-like peak. The sweat band is quite wider and the closure is garterized. I can also style the sweat band as wide or thin head band as well. So stylish!


This one really looks fab. I love the purple color! The sweat band is same size up to the back, stretchable and can style as head band, too. Plus, it’s super soft. The white and the purple visor are my faves for summer wearing and shopping, etc.


This is my fave of all Fashion Sun Visors I bought from NIKE. The sweat band is cotton twill, the closure is garterized and adjustable, and the peak's circumference?.... wow! Its 10-inches! That's why this is my fave because it protects my whole face and front neck as well from the direct heat of the sun. You're just looking at the evidence now. See? Hehehe. Honestly,this is perfect for tour and sightseeing or any activities that will require you to go under the heat of the sun.

Of course, these wristbands poignets are a steal, too. So cute!

So, that's it for now. I hope I didn't bore you of the tons of pictures posted. Hehe.. I am so excited to use my new nail polishes and do nail art. I will post soon my work of art.

XX, 

Jenniya