Showing posts with label Palladium Rice Powder. Show all posts

Thursday, 1 March 2012

FOTD: Green is the color of the day by LOUJENE


Shirt by St. John's Bay

Last Sunday, I get bonded with my in-laws. I don't often see them and I get flattered when my Mom-in-law said that my skin is glowing and I'm looking fairer compared to the last time she saw me. I said that we intentionally don't go out under the sun nowadays because we wanted to get a nice line of tan this coming summer. Lol!

For today's post, I've used for the very first time a lovely make-up palette from LOUJENE - a Japanese make-up brand.

LOUJENE


For this look, below is the lists of the products that I've used.

For the face:
- Myra Daily Sun Protect Facial Moisturizer SPF 15
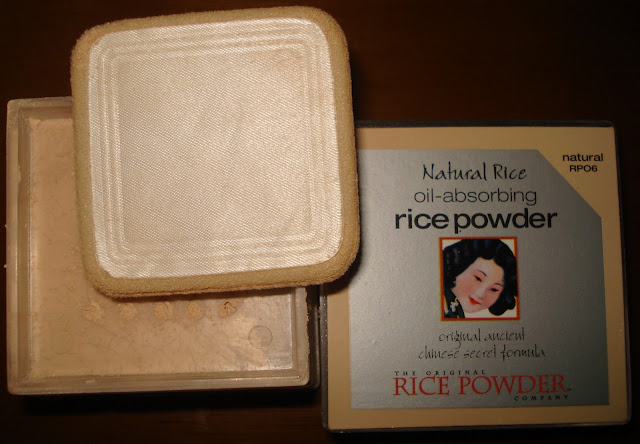
- Palladium Natural Rice oil-absorbing rice powder

For the eyes:
- LOUJENE 9-colors eyeshadow palette
- NYX eyeshadow base
- IN2IT eyebrow kit
- ELF eye widener pencil in Pearl
- Maybelline Hyper Curl Volum Express mascara

The eye shadows are shimmer wash and some are semi-mattes. Love!

I love earth colors!

1. I applied it all over my lids up to the brow bone.
2. I applied it in the inner third of my lids just up to the crease.
3. I applied it on the outer part/ outer-V of my lid.
4. I applied it in the inner corners of my eyes on top of the ELF eye widener in Pearl.

Fyi, I applied my Bobbi Brown in Espresso to darken my outer-V.

For the cheeks:
- Avon lip & cheek tint
- NYX Blush 

For the lips:

I combined the two (2) shades of the lipsticks. I applied first the Wet 'n Wild, and then I blot it with tissue. I did it twice for the Noveau Pink. Next, I applied the Ever Bilena on top of it. 

Nice result of the combi, eh?


XX,


Sunday, 19 December 2010

Face It: Get Glam This Holiday Season with NYX Cosmetics


Happy Holidays! I missed blogging a lot. I've been very busy lately "making" money to spend this  holiday season hahaha. Thanks God for all the blessings. Whoah! Christmas is just 4 days away and yes, of course, Christmas Party is happening left and right, people are very busy going to the malls and what else shall I say? The result is a very heavy traffic! Hehehe...

Speaking of Christmas Party, I really miss attending a Christmas Party. Ever since I decided to go Freelancer, I haven't got the chance to attend Christmas Parties. The last party I've attended was from my previous work years ago. *Sniff sniff... I miss the Angels hehehe...

Today, I want to share with you the FOTD (Face Of The Day) I made which I think would help you prettify yourself in attending your Christmas Party with not spending much going to a salon to have your hair and make-up done. 


You can use your available make-ups if you have a similar color with what I have used in this tutorial. I used inexpensive imported cosmetics named NYX. This is also locally available by an online reseller but I got mine by ordering through CherryCulture.com online. I love NYX because aside from its cheap price, they've got colors that are really great to play with. But I already stopped buying cosmetics online because aside from I already have enough make-ups; the customs duties and taxes really, really SUCKS! If I needed to have some again, I would purchase to a local online reseller (a lot in Multiply site).

 Oh I love the colors!

____________________________________________________________________________
Step 1.) 
To start with, moisturize your face first so the cream foundation will smoothly glide on when applied. I'm using Clean & Clear Oil Free Moisturizer. Apply a small amount onto your clean face and neck.

...oO0Oo...
Step 2.) 
Apply the Etude House BB Cream onto face and neck using an angled foundation brush. 


...oO0Oo...
Step 3.) 
Set your foundation with powder. I'm using Natural Rice Oil Absorbing Powder in Natural. I used a large foundation brush to apply the powder onto face and neck.

...oO0Oo... 
Step 4.) 
Apply an eye shadow base to make your eye shadow last longer and make the color more vibrant. I used NYX eye shadow base in Skintone. Apply it onto lid up to the brow bone. Use your smallest finger to spread the cream on your lids. Also apply a little in your lower lashline, too.

...oO0Oo... 
Step 5.) 
Lined your eye brows. Well, this is optional. You can do your brows later on. I used IN2IT eye brow powder.
 

...oO0Oo...
Step 6.) 
Using the eye shadow brush, I picked the silver labeled as ES26 from my NYX palette. I applied it onto my eye lids starting from the outside corner of my eyes outward leaving the outer crease area. See the whole palette below so you can recognize which color I am pertaining to. 
 
NYX Palette


...oO0Oo...
Step 7.) 
Using the eye blending brush, I picked from my NYX palette a royal blue color labeled as ES24 and applied it in the outer-V and crease area.
 

...oO0Oo...
Step 8.) 
Using a fluffy eye shadow brush, I picked a shimmery white eye shadow labeled as ES21. I applied it onto my brow bone sweeping it down to the corner of my eyes.
 

...oO0Oo...
Step 9.) 
Using an eye blending brush, I picked Blue-black color labeled as ES30 from the palette and applied it onto my outer-V in circular motion and blend it inwards and onto the crease area with the royal blue color.
without camera flash
with camera flash
with camera flash

...oO0Oo...
Step 10.) 
Line your eyes. I used IN2IT liquid eye liner in Black. Apply it closely in the lash line.You can wing it a bit at the end if you want.

...oO0Oo...
Step 11.)  
Using a flat eye liner brush, I picked the blue-black color from the palette and applied it onto the lower lash line up to 2/3 area. Then, I lined my water line with IN2IT eye liner pencil in Black. Curl your lashes and apply your favorite mascara. I used IN2IT water proof mascara in Black.

...oO0Oo...
Step 12.) 
Contour your cheeks if necessary. Photo below are the blusher, powder and bronzer from my NYX palette. Using my flat-top bronzer brush, I picked B6 and applied it to my cheeks starting from the side of my ear down to the hollow of my cheeks. This will make your face look thinner. Then, I picked B3 and applied it in the apple of my cheeks bringing it up to my highest cheek bones. Then, I blend it over to my hollows, jaw bone and to the chin bone.
 

...oO0Oo...
Step 13.) 
Lastly, apply your favorite lippie. I used my Revlon Colorburst lipstick in Blush. Then, I top it off with shimmery lipgloss.
 

So, that's it! You're done now with your make-up. It's time to make your hair a do! So, go grab your curling iron and set your loose curls!


I hope this make-up tutorial helps. It's just a basic but then, simple strokes of make-up will make you pretty. Agree? Thanks for reading beauties!

Smile and stay tuned.

XX,

Jenniya

Sunday, 21 November 2010

Face It: Back In Birthday's Smokey Eye with Bobbi Brown + NYX + IN2IT


It's been quite a long time since I last posted. A lot of things are keeping me busy up to now and I got lazy to write any. But then, today is my birthday and I have the reason to write. Well, a year has added to my age and yeah, I'm not getting any young-er. But I don't hate it that I'm turning old-er today. Believe me hehehe.

I woke up so late today. And I don't have plans for my birthday actually. But my hubby calls for a treat. So, after eating our breakfast, I got myself prepared for this special day. Some of my friends already posted their greetings in my FB account. Well, I don't have so many friends I tell you hehehe. My hubby posted his sweet birthday greeting and he was one of the firsts who greeted me last night. Thank you so much to all who greeted me in my birthday.

Taken from my Sony Cybershot with Flash.


 Taken from my iPhone4 set without Flash.


I decided to blog the smokey eye I did today so that I will have even one (1) entry for this month of November lols! So, please bear with me again for my poor beauty blogging skills for this smokey eye tutorial.

Step 1.) 
I have oily skin (T-zone), so every time I wash my face, I used Clean & Clear Deep Action Clean Oil Control onto face. After that, I used Clean & Clear Oil Controlling Toner to minimize my large pores. Then, using the angled foundation brush, I applied the Etude House BB Cream (in Refreshing) onto face and neck. Using the large powder brush, I set my face with Natural Rice Oil Absorbing Powder in Natural RP06.
 

Step 2.) 
Using a concealer brush, I applied NYX Eye Shadow base onto entire lid of the eyes up to the brow bone. This is to enhance more the color of the eye shadow. Then, apply thinly to the lower lash line, too.

Step 3.) 
Using my Bobbi Brown Stonewashed Nudes Palette in Hot Stone (or any light brown or brown eye shadow), I applied it onto the lids using an eye shadow brush. After that, I picked NYX in Eggplant and applied it on top of Hot Stone. 
 
Apply this NYX in Eggplant on top of Hot Stone.

 Don't worry with the harsh edges and lines...
... because it will be soften down using the Eye Blending brush. Blend! Blend! Blend!

Step 4.) 
My eyes aren't that small but still I wanted it to look bigger. Using the Bobbi Brown in Espresso or any Brown Black or Black eye shadow, I used the eye blending brush to to pick the color and applied it to my outer-V.
Applied in outer-V.
Outer-V effect when eyes closed.


 See? It made my eyes look bigger. Agree?
Step 5.) 
Using medium-fluff eye shadow brush, I picked Navajo from Bobbi Brown palette or any highlighter or any matte white eye shadow. I applied it in my brow bone, down to the inner corner of my eye, then blend it with the edges of the eye shadows in the eyelid to soften the harsh lines.

Step 6.) 
Again, using medium fluff eye shadow, I picked Rock from Bobbi Brown palette or any gray/ silver eye shadow and applied it onto the eyelids on top of all the eye shadows applied. Make a blending motion. 

Step 7.) 
Using a flat eye liner brush, I picked Espresso again to line my lower lash line. Start from the outer line to the corner of the eyes.


Step 8.) 
To make my eyes more dramatic, I used IN2IT All Black Waterproof eye liner in my waterline up to the tear duct area. In my eye brows, I used Maybelline Eye Studio. I applied first the wax onto the brows following the natural arch of my eye brows and then, I applied the brow powder. 
 

Step 9.) 
I lined my upper lash line using the IN2IT black liquid eye liner and winged it at the end for a cat eyes look effect.

Step 10.) 
Using STILA in Moonlight, I picked a little using the tip of the eye blending brush and applied it in the corner of my eyes and then, I applied a little in my brow bone to make my eyes proportioned to the corner of my eyes and to make it look brighter. Curl your lashes. Then, I applied mascara using IN2IT All Black. I usually applied 2 coats. Apply your favorite pinkish blush-on. I used my Bobbi Brown in Pink Clay using a large powder brush.
 

Step 11.) 
And lastly, for my lips, I applied NYX round lipgloss in Ballerina. Then, you're done!

Here's more shots of my FOTD for this month.
 

My birthday celebration today was just indeed as simple as you might imagine. I and hubby went to SM North Edsa and Trinoma. We ate at Kangaroo Jack (my hubby's simple treat) hehehe. He bought a bag for me as his gift. Thanks much to hubby! Muah! Muah! I just love the way you make me happy through your simple ways.


Smile always and stay tuned.

XX,

Jenniya